Time File Import Configuration
To configure a Time File Import, navigate to the Customize section within the Company tab and select the Time File Import Card.

Existing Time File Import Configurations will be displayed within this card with the options to View, Edit, Delete, or Copy if maintenance is needed. To create a new Time File, click the blue "+ New Configuration" button in the top right corner of the screen.

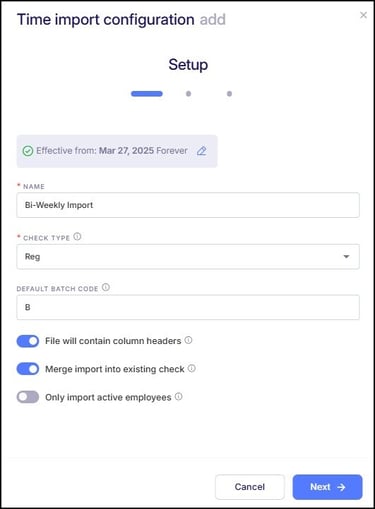
Setup
The first of three sections when configuring a new Time File is the "Setup" section, where general rules and settings for the import are established.
 Please note the following fields within this section:
- Name- Enter a name for this import based on how or when it might be used.
- Check Type - This is referring to the Check Type that should be applied to the pay records being imported. If the appropriate Check Type is not available within this dropdown, contact Empeon Customer Support.
- Default Batch Code - The Batch Code associates the time file import option with a specific payroll batch it should be available for. If the import will be used in a regularly scheduled batch, the Batch Code entered here should match the scheduled Batch Code.
- Please note that this field is optional. Time File Imports can still be manually added to any batch, regardless of what is entered here. However, to make the import automatically available for scheduled batches, it is recommended to enter the applicable Batch Code.
- File will contain column headers - Toggling this option on indicates that the import file includes headers, prompting the system to skip the first row of the CSV file.
- Merge import into existing check - Toggling this option on merges the imported data into the existing check for the employee; otherwise, it will be imported as a separate check. In scenarios where multiple imports are needed for a batch, it is important to first import the Time Files that should be merged into the existing check. Once that is complete, import the Time Files that should be applied to a separate check to ensure accurate payroll processing.
- Only import active employees - Toggling this option on will only import data for employees indicated as Active within Empeon Workforce. Empeon highly recommends leaving this toggle off. Doing so ensures that, in cases where an employee was terminated but still has recorded hours within the pay period, the system will still process those hours, ensuring the employee is paid appropriately.
After all necessary settings have been configured, click "Next" to move onto the Field Mapping section.
Field Mapping
The middle section when configuring a Time File Import is Field Mapping. This is where the appropriate fields and their respective columns on the time file are mapped appropriately within Empeon Workforce. There are two additional settings on this screen that are specific to the import file:
- Identify Employee By - Establish whether it will be the Employee ID, Employee Clock ID or Employee Social Security Number used to identify employees on import.
- Add Job Code if missing - If Job Codes are being used for labor tracking, enabling this setting will automatically add any new Job Codes to Empeon Workforce, if they have not yet been created on the company-level.
Once these settings are configured, the remaining steps involve mapping the import file.
All Time Files must include the field for Employee Identifier and DET Code. In most cases, Time Files are being used to import pay, however if the import includes Deductions as well, the DET field will also need to be included in order to specify whether the DET Code represents an earning (E), deduction (D), or tax (T).
All Time Files must also include fields for Hours, Rate, and/or Amount, depending on the payment method for the DET Code.

Here is an example of how the CSV file would look based off of the mapping within this section:

Please note that export files from various time and attendance systems may have headers with different verbiage than those defined in Empeon. In such cases, it is acceptable if the headers do not match, as long as the values in each column are correctly mapped to the corresponding category in Empeon.
For example, an export file might have headers such as "Start Time" and "End Time" to reflect each series of recorded time punches. Defining it this way on the spreadsheet is acceptable, just as long as both columns are correctly mapped to "Clock In" and "Clock Out" within the Field Mapping section of the Import Configuration.
Once all appropriate fields are mapped, click "Next" to move onto the Code Mapping section.
Code Mapping
Code Mapping refers to Deduction, Earning and Tax (DET) Codes listed on the import file. If any DET Codes on the import file differ from what is set up in the system, code mapping is required in order to ensure that the proper DET Codes being imported are applied correctly.
If Code Mapping is not configured, DET Codes on the import must match the DET Codes set up within Empeon Workforce.

Click "Save" to finalize the Time Import Configuration. Once saved, the import configuration will be available within the designated payroll batch, linked through the assigned Batch Code. For any questions regarding how to configure a time file import please contact Empeon Customer Support.
For instructions on how to import a Time File within a payroll batch, please refer to Empeon's article Importing Time Files.