Payroll Earnings are amounts added to an employee's paycheck, typically reflecting compensation for work performed during a specific pay period. Common examples of earnings include regular wages, overtime, and paid time off (PTO). Empeon Workforce uses Earning Codes to define earnings applied within payroll, with these codes being registered within the company settings. When new Earning Codes need to be created, this article explains the key considerations for setting them up.
Setting Up Earning Codes
To set up new Earning Codes at the company level or review and manage those that have already been configured, navigate to the Payroll section within the Company tab and select Earnings & Rates Card.

The Earnings & Rates Card will default to the subtab for Earning Codes and display all active Earning Codes that have been set up and are available for use. For each Earning Code that has been created, there are options to Edit, View, Deactivate and Delete.
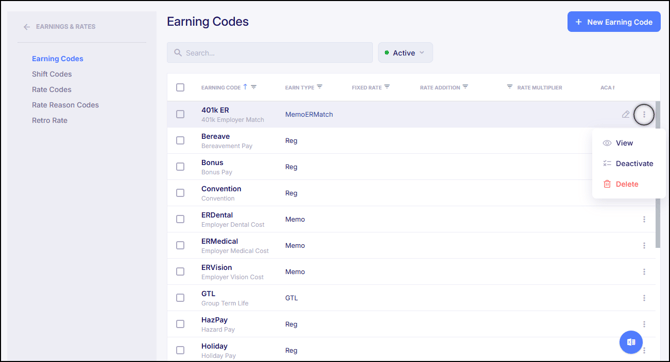
To copy any existing earning codes to another company within the organization, click the checkbox to the left of the Earning Code and then click the Actions button in the lower right of the screen.
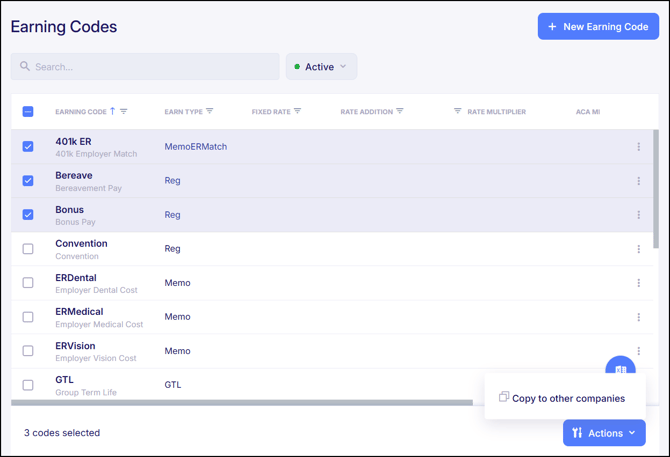
Otherwise, to set up a new earning, click the blue button that says "+ New Earning" in the top right corner of the screen.
General Settings
When setting up a new Earning Code or editing an existing one, a window will appear prompted for the configuration of the earnings General Settings. Here is a breakdown of each field on this screen:
-
 Earning Type - This determines the classification of the earning, including how it is taxed and reported on W-2 forms. Within the Earning Type dropdown, there are predefined options to choose from, each with tooltips that help to explain what the Earning Type is typically used for. In most cases, the Earning Type for "Reg" is applied for any earning associated with both worked and non-worked hours. However, other options are available within this dropdown that define more specialized earnings. For further support or clarification on which Earning Type to select, please contact Empeon Customer Support.
 - Unique Earning Code - Create a 10-character max code representing the earning need. When creating Earning Codes, avoid using spaces or special characters.
- Earning Description - This what is printed on the paycheck associated with the earning amount.
- Code Groups - This allows for the earning code to be directly added to any applicable Code Groups, ensuring that any groups that impact calculations or reporting stay up to date with ease.
- Block tax withholdings - Toggling this on will block tax withholding for all applicable non-percentage withholding taxes. Please note that activating this setting does not exempt the earning from taxes; it only blocks the withholding amount. Taxable wages will still be recorded and need to be reconciled when the employee files their taxes.
- Exclude From Total Hours on paystub - Toggling this on will allow earnings to be recorded without counting them toward the employee's Total Hours. This can be useful for non-worked hours, such as PTO and Sick, if there is the preference is to have Total Hours only reflect worked hours.
- Exclude also from total hours on pay history, and reports - This will exclude the hours recorded with the earning from being included on the employee's Total Hours listed in Pay History and on Reports.
- Exclude Hours from GL - Depending on how General Ledger (GL) is configured, toggling this on will allow hours to be recorded without being reflected within GL.
- Include on Pay Stub? - This is a required field with three options to choose from: Yes, No, Benefits Section.
- Yes - Hours and wages recorded under this Earning Code will print in the Earnings section of the employee's paystub ('Yes' is applied by default). Empeon recommends that any Earning Codes affecting employee gross should be included on employee paystubs.
- No - Hours and wages recorded under this Earning Code will not display on the employee's paystub. This is sometimes appropriate for Memo types of earnings used for employer tracking purposes but are not relevant information for the employee.
- Benefits Section - Amounts recorded under an Earning Code with this setting will print in the Benefits section of the employee's paystub. It's usually best to display Earning Codes used for non-cash employer benefits in the Benefits Section, like an employer provided 401k match amount.
- Third Party Agency - Though more common with deductions, Earning Codes can be set up to direct funds to a designated third-party. Third-Party Agencies must first be registered before they can be selected here. However, assigning a third-party agency to a company-level Earning Code will automatically apply the agency to the earning whenever it’s used in payroll or on the Employee Profile. It is generally recommended to leave this field blank when adding an Earning Code at the company-level, unless the earning should be applied toward the same agency across all employees it may be applied to.
- Include in ACA Measurement? - According to the IRS, “An hour of service is each hour for which an employee is paid, or entitled to payment, for the performance of duties or for time during which no duties are performed due to vacation, holiday, illness, incapacity (including disability), layoff, jury duty, military duty, or leave of absence.”
If an Earning Code falls under this definition, it should be included in the ACA Measurement. This indicates that the hours associated with the Earning Code will count toward the employee’s full-time or part-time classification for ACA purposes. - Display Order Priority - By default, Earning Codes are listed alphabetically within the earnings section of the pay stub. However, a custom priority order can be set to reorganize the display of earnings. This order is defined numerically, with lower numbers appearing in the earnings section first. If a mix of Earning Codes with and without an assigned order priority exists, the system will display those with a priority first, followed by the others in alphabetical order.
- GL Account - This field will only be available if the General Ledger (GL) Configuration is mapped with predefined GL fields. he relevant GL accounts for tracking the earning should be entered here to ensure the Earning Code is properly recorded in the GL.
Once all fields have been appropriately attended to, click "Next" to move onto the Earning Code's Calculation Settings.
Calculation Settings
The Calculation Settings section defines any amounts or special calculations applicable to the Earning Code. At the company-level, for most Earning Codes, defined hours, rates, and/or flat amounts are determined per employee. As a result, this section is typically left blank and handled when the Earning Code is assigned on the Employee Profile.
However, please still note what each field controls:
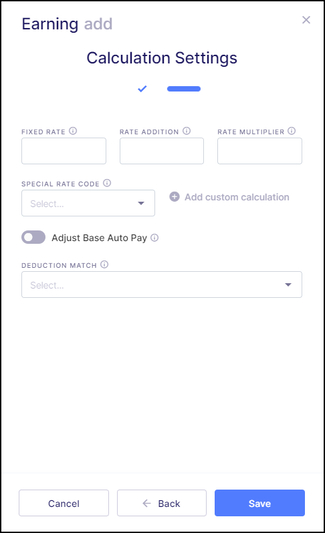
- Fixed Rate - If the pay for an Earning Code is applied at a consistent rate across all employees it is assigned to, enter the fixed rate in this box. This is commonly used for earnings such as Shift Differential rates, which are added to an employee’s regular hourly earnings.
- Rate Addition - The amount entered in this field will be added to the employee's default hourly rate when the Earning Code is applied. For example, if a "2" is entered here, and the employee's default hourly rate is $20, the system will calculate a rate of $22 on the paycheck when this earning code is applied. This is also commonly used for Shift Differential codes.
- Rate Multiplier - The value entered in this field will multiply the employee's default hourly rate when the Earning Code is applied.
- Special Rate Code - If this Earning Code should be applied toward an additional rate rather than the employee's default rate, the designated Rate Code can be assigned.
- Adjust Base Auto Pay - This option should usually only be activated for non-worked Earning Codes, such as Paid Time-Off (PTO). It only affects employees that are set to Salary or Auto Pay Hours within their Employee Profile. When this option is toggled on, hours recorded for a PTO kind of code will reduce the employee's Default Hours when applied on the check. This results in the employee's hours being properly adjusted when being paid non-worked earnings like PTO and Sick, without the need for the Payroll Admin to manually adjust this on the check.
- Example: If an employee's is set up with a Base Auto Pay of 40 Default Hours and they take 8 hours of PTO, enabling this setting ensures they are still paid 40 total hours when auto-paid, but the hours will be split between 32 hours Reg, and 8 hours PTO on the check.
- Deduction Match - This feature is typically used for Earning Codes representing Taxable Non-Cash Benefits that need to be reported for tax purposes. When a general deduction code is assigned as the Deduction Match, it will offset the Earning Code amount, ensuring no cash is paid while still recording the taxable wages for tax reporting.
After reviewing each field on this screen, click the blue "Save" button to finalize the Earning Code. After saving, a reminder about existing Code Groups set up in the company settings will appear. For any newly added Earning Codes that may apply to these Code Groups, review the relevant Code Groups accordingly.

For more information on setting up a recurring earning on an Employee Profile, refer to Empeon's article Fringe Benefits & Employee Auto Pays.