One of the main categories of Reports available within Empeon Workforce is Live Reports. These reports are typically used to analyze data that has been entered in Empeon Workforce. In comparison to Standard Reports, Live Reports tend to offer more customization in determining what should be included within the report.
This article explains everything to consider when running a Live Report. For a full list of available reports and details on what each report includes, please refer to Empeon's article Available Live Reports.
To run or schedule a Live Report, navigate to the Reports tab and remain within the Reports section. Then click the "+ Live report" button in top right corner of the screen.

A screen will appear listing categories of Live Reports that are available.

Below is a general overview of what each Live Report category typically includes:
- Employee - Reports used to confirm various items assigned on the Employee Profile.
- Payroll - Reports used to review and analyze processed payroll data.
- Company - Reports used to confirm company-level setups.
- Attendance - Reports used to review and analyze time & attendance records.
- Benefits - Reports used to review and analyze accruals, benefit plans and wage parity.
- Log Changes - Only the Log Changes report exists within this category, which is a report that lists all record changes that have been within Empeon Workforce and who made the change. This report can be ran for a specified date or date range.
- Pivot Grids - Only the Pivot Grids report exists within this category. It function similarly to PivotTables in Excel. This Live Report allows Users to define how data is grouped and displayed by selecting which fields appear as columns, rows, and values. The result is a customizable, grid-style report that provides flexible insight into data by enabling on-the-fly sorting, filtering, and summarization. This makes Pivot Grids especially useful for identifying trends or breaking down complex datasets into more digestible formats.
With the exception of reports within the Payroll category, all Live Reports display real-time data as they are processed. Upon selecting a report within the Payroll category additional options will appear on this screen to "Filter By".
Payroll Live Reports can be filtered by Date or Process. When filtering by Date, the report can be run for a predefined or custom date range. When filtering by Process, the report refers to previously processed payroll batches and requires selecting one or more check dates the report should reference.

After selecting a category, use the Report Type dropdown to select a report. Options available within this dropdown will vary based on the category that is selected. After selecting a report, click "Preview".
Live Report Configuration
The next screen will display a preview of the report, along with various configuration options that can be used to customize the report’s layout and content.

Starting within the lefthand column, there are two tabs available for manipulating the report: Basic and Schedule.
Please note the following settings on the Basic tab:
- Additional Companies to Include - If there are multiple companies within the organization, this allows for the ability to include additional companies within the report.
- Apply changes - When additional companies are added, they will not appear in the Live Report preview until this button is clicked.
- Report Name - This field automatically populates to the selected template but can be renamed if desired. The name entered in this field will be what the report is referred to internally within Empeon Workforce once it has been run or scheduled.
- Report Description - This field also automatically populates based on the selected template but can also be renamed if needed. The description is also displayed internally within Empeon Workforce, in conjunction with the Report Name once the report is run or scheduled.
- Make this report private - This controls whether the report is private to the person running the report, or public to other Workforce Users within the organization.
- Lock report (only creator can edit) - If the report has been made public, this will prevent other users from being able to edit the report's configuration. Only the report creator will be able to edit this report, if necessary.
The Schedule tab only requires configuration if the report needs to be scheduled. When setting up a report on a schedule, please note the following fields:
- Report Type - By default, this will be set to "On demand". To configure the report on a schedule, select "Scheduled". This will display additional settings for how the report should be scheduled and delivered.
- File Type - Defines the file format available for downloading the report. Available formats for Live Reports are Excel and CSV.
- Override File Name - This establishes the file name of the report when it is downloaded to a computer or mobile device.
- Schedule Type - There are two options available here: Payroll and Custom. Selecting Payroll will schedule the report to run in conjunction with payroll batch processing. The predefined schedules available with this option include:
- Every Payroll
- First Payroll of the Month
- Last Payroll of the Month
- Last Payroll of the Quarter
- First Payroll of the Year
- Last Payroll of the Year
The Custom option is not linked to payroll processing. Instead, it allows for the creation of a user-defined schedule that runs independently of any payroll actions. - Delivery Methods - There are three Delivery Methods to consider:
- Email - Sends the report to designated recipients via email. Recipients can include Workforce Users or non-Workforce Users, provided their email address is registered under Email Recipients in the Organization Master Portal.
- FTP - Sends the report to a designated server, either hosted within the organization or by a third party. This method provides a more secure way to transfer reports (compared to email).
- File Room - Posts reports to the File Room, a section within the Reports tab of Empeon Workforce. Only Empeon Customer Support can schedule reports to be made available here. It is primarily used for payroll-related reports and tax documents. To have additional reports posted, contact Empeon Customer Support.
Column Chooser
Within the Live Report preview, the Column Chooser allows for columns to be added or removed from the report. All Live Reports include pre-populated columns based on the selected report, all of which can be adjusted as needed. The Column Chooser is located in the top right corner of the preview screen.

Upon selecting the Column Chooser option, a window will appear that is divided vertically into two sections: Available Columns on the left and Selected Columns on the right. To add or remove columns, simply drag and drop the desired field from one section to the other.

Selected Columns can also be reordered to control the sequence in which fields appear on the report. Columns can also be reordered directly within the Live Report preview by dragging and dropping them into the desired order.

The sequence in which columns are organized will also be the order in which they are reflected on the report.
The ability to customize Live Reports with designated fields and adjust their order ensures the report displays only the most relevant data, in the preferred layout. This aspect to Live Reports can be helpful for import and export files, where field alignment and formatting may need to match specific requirements.
If there is a need to reset the report to it's original layout, click on the Column Chooser gear once more and select Reset table to default.

Live Report Filtering
Each column within the Live Report preview can be filtered to display only data that meets specific criteria, making it easier to focus on what’s relevant.

For reports within the Employee category of Live Reports, a “Filter” option is also available at the top of the preview screen to limit the report to a specific segment of employees. Filters can be applied either by creating a quick filter on the spot or by selecting a predefined Filter Group that has been already configured within the company-level settings.

For all reports, a Compact View toggle is also available, which condenses the preview to more closely resemble the layout of an Excel or CSV file.

If a filter has been applied and needs to be reset, it can be removed by adjusting it the same way it was initially set. If there have been several filters that have been applied that require resetting, there is also the option within the Column Chooser gear to Clear Filters.

Renaming Columns
Any column on a Live Report can be renamed to suit how the column needs to be exported. To do this, right column on the column that should be renamed and select the option for "Rename column".
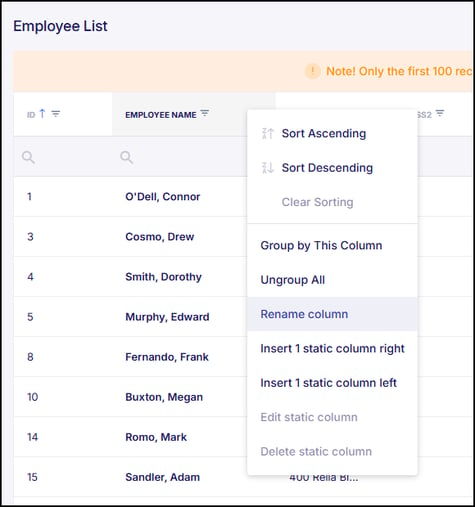
A window will then appear with the "Original Column Name" and a field for "Rename Column As" where the new name of the column can be entered. Any column that is renamed will be exported appropriately.
Adding Static Columns
Static Columns can be added to any report as needed. Static Columns are used to include a column that contains the same value for every row, or a blank value for every row. A Static Column does not pull data from employee or system records. Instead, the value is manually defined by the user and applied toward each row listed on the report.
To add a Static Column to a Live Report, right-click on a column header next where you want the new column to appear. From there, choose to insert a Static Column to the left or right of the selected column.
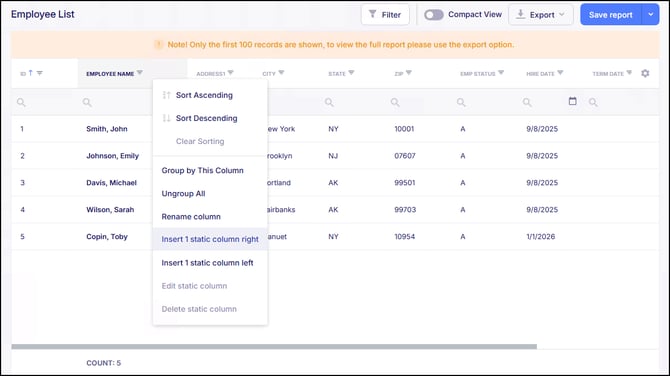
A window will open prompting for entry of a Column Name and, if applicable, a Column Value. If all rows should have the same value, enter it here, or leave it blank if the column should remain empty for every row. Any static column that has been added will be exported appropriately.
Live Report Grouping
Any column within a Live Report can be grouped to display that column as a row header, allowing for cross-referencing with the other columns in the report. To do this, right click on the appropriate column and select "Group by This Column".

In this scenario, we are grouping the report by "Employment Status" to categorize the employees listed on the report by their employment status. Dropdown options are available for each status type.

Save vs. Export
Once the Live Report have been configured according to preference, the report can either be exported or saved—each option serving a different purpose.
Exporting will generate the report in real time and download it to the computer immediately. This option does not close the screen, allowing for changes to be made and the report to be re-exported if there are adjustments that are needed. However, exporting does not preserve the report settings for future use. This means the report will not appear in the Reports section as a record of it being run, nor will it provide the option to run it again later on.
Saving the report will store it in the Reports section under either the On Demand or Scheduled tab, depending on how the report is configured. This ensures the report and its settings remain accessible for future reference or recurring use. Any report that is scheduled or intended to be shared publicly should be saved in order to ensure that it appears in the Reports section. Simply exporting will not retain the configuration.